Chevrolet Captiva Service & Repair Manual: Parking Brake Cable Adjust
Procedure
| If the rear wheels rotate during
the following test, repeat the adjustment procedure completely. |
| 1. |
Disable the parking brake cable adjuster. |
| 2. |
Turn the ignition to the OFF position. |
| 3. |
Raise and support the vehicle. |
| 4. |
Remove the rear tire and wheel assemblies. |
| 5. |
Remove the rear brake rotors. |
| 6. |
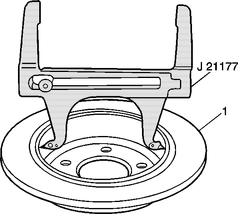
Set the CH-21177-A drum to brake shoe
clearance gauge inside of the drum portion of the disc brake rotor
at the widest point. Place the contacts on the tool to the widest
point of the park brake drum (1). Tighten the set screw on the tool
prior to removing the tool from the drum, Fig. 1. |
| 7. |
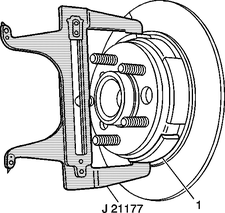
Position the CH-21177-A drum to brake
shoe clearance gauge over the parking brake shoes (1) at the widest
point, Fig. 2. |
| 8. |
Turn the adjuster on the actuator until
the park brake shoes just contact the CH-21177-A drum to brake shoe
clearance gauge. |
| 9. |
Repeat steps 6-8 for the opposite parking
brake assembly. |
| 10. |
Install the rear brake rotors. |
| 11. |
Install the rear tire and wheel assemblies. |
| 12. |
Enable the parking brake cable adjuster. |
| 13. |
Apply the electronic parking brake. |
| 14. |
Place the transmission in NEUTRAL. |
| 15. |
Raise and support the vehicle so the
tire and wheel assemblies are clear of the ground. |
| 16. |
Attempt to rotate the rear tire and
wheel assemblies. The wheels should not rotate forward. The wheels
should not rotate rearward, or should exhibit significant rearward
drag. |
| 17. |
Release the electronic parking brake. |
| 18. |
Verify the rear tire and wheel assemblies
rotate freely and do not exhibit forward or rearward drag. |
| 19. |
If the rear tire and wheel assemblies
do not rotate freely and without forward or rearward drag, repeat
the adjustment procedure completely. |
|
Adjuster Disabling
| The park brake cable tension is
controlled by the electronic park brake (EPB) module. Tension can be fully
released from the park brake cables to allow for service of the park brake
system. Perform one of the following methods to fully release cable tension. |
Electronic Method
With Scan Tool -- Preferred
| 1. |
Block the drive wheels. |
| 2. |
Install a scan tool to the vehicle. |
| 3. |
Turn the ignition switch to the ON/RUN
position with the engine OFF. |
| 4. |
Using the scan tool, perform the following: |
| |
a. |
From the scan tool menu, select "Diagnostics." |
| |
b. |
Enter the appropriate vehicle information. |
| |
d. |
Select "Parking Brake Control Module." |
| |
e. |
Select "Special Functions." |
| |
f. |
Select "Cable Replacement." |
| 5. |
Follow the instructions on the scan
tool to fully release the tension on the parking brake cables. |
|
Less Scan Tool -- Optional
| 1. |
Block the drive wheels. |
| 2. |
Turn the ignition switch to the ON/RUN
position with the engine OFF. |
| 3. |
Place the automatic transmission in
PARK or manual transmission in NEUTRAL, as equipped. |
| 4. |
Apply and hold the brake pedal. The
brake pedal must remain applied throughout the park brake cable
tension release process. |
| 5. |
Press and hold down the electronic
park brake (EPB) switch approximately five seconds. |
| 6. |
Observe the PARK BRAKE lamp on the
instrument cluster. |
| 7. |
When the PARK BRAKE lamp flashes, release
then immediately press and release the EPB switch. The parking brake
cable tension is fully released. |
| 8. |
Release the brake pedal. |
|
Manual Method
| In the event the above methods
to release the parking brake cable tension are unsuccessful, the following
procedure may be necessary to release the parking brake cable tension. |
| The protective plug for the manual
release is located near the electrical connector. |
| Do NOT use power tools to rotate
the manual release mechanism. Use of power tools can damage the EPB module
gear drive mechanism. |
| 1. |
Raise and support the vehicle. |
| 2. |
Remove the protective plug from the
EPB manual release. |
| 3. |
Using an appropriate tool, rotate the
mechanism clockwise until the tension is fully released from the
parking brake cables. Up to 50 cycles may be required until the
parking brake cable tension is fully released. |
| 4. |
Install the protective plug to the
EPB module. |
|
Adjuster Enabling
| The park brake cable tension is
controlled by the electronic park brake (EPB) module. Cable tension needs
to be set and the EPB module needs to be calibrated following the cable
tension disabling procedure. Perform one of the following two methods to
fully restore cable tension. |
Electronic Method
With Scan Tool -- Preferred
| 1. |
Block the drive wheels. |
| 2. |
Install a scan tool to the vehicle. |
| 3. |
Turn the ignition switch to the ON/RUN
position with the engine OFF. |
| 4. |
Using the scan tool, perform the following: |
| |
a. |
From the scan tool menu, select "Diagnostics." |
| |
b. |
Enter the appropriate vehicle information. |
| |
d. |
Select "Parking Brake Control Module." |
| |
e. |
Select "Module Setup." |
| |
f. |
Select "Parking Brake Calibration." |
| 5. |
The EPB module will be calibrated and
proper tension will be applied to the parking brake cables. |
|
Less Scan Tool -- Optional
| 1. |
Block the drive wheels. |
| 2. |
Turn the ignition switch to the ON/RUN
position with the engine OFF. |
| 3. |
Apply the brake pedal. |
| 4. |
Place the automatic transmission in
PARK or manual transmission in NEUTRAL, as equipped. |
| 5. |
Momentarily lift then release the EPB
switch to apply the EPB. |
| 6. |
Momentarily press down then release
the EPB switch to release the EPB. |
| 7. |
Repeat steps 5-6 to cycle the EPB on
then off an additional four times. |
| 8. |
The EPB module will be calibrated and
proper tension will be applied to the parking brake cables. |
|

Fig.
1

Fig.
2
Adjusting the parking brake cable on a 2017 Chevrolet Captiva is a relatively simple procedure that can be done with basic tools. Start by parking the vehicle on a level surface and engaging the parking brake. Then, locate the parking brake adjustment nut under the vehicle near the rear wheels. Use a wrench to loosen the nut slightly.
Next, move inside the vehicle and locate the parking brake lever or pedal. Depress the parking brake lever or pedal fully, then release it completely. Repeat this process several times to ensure the parking brake mechanism is engaged and disengaged properly.
Return to the adjustment nut under the vehicle and tighten it gradually until the parking brake lever or pedal has the desired amount of resistance when engaged. Be cautious not to overtighten the nut, as this can cause the parking brake to drag or fail to release completely.
After adjusting the parking brake cable, test the parking brake to ensure it holds the vehicle securely in place on an incline. If the parking brake does not function as expected or if there are any unusual noises or issues, consult a professional mechanic for further inspection and adjustment. Regular maintenance of the parking brake system is essential for vehicle safety and proper operation.
Front
Removal
1.
Disable the parking brake cable adjuster.
2.
Turn the ignition to the OFF position.
3.
Raise an ...


 Parking Brake Cable R&R