Chevrolet Captiva Service & Repair Manual: Parking Brake System Adjust
Adjustment procedure
| If the rear wheels rotate during the following test, repeat the adjustment procedure completely. |
| 1. |
Disable the parking brake cable adjuster. |
| 2. |
Turn the ignition to the OFF position. |
| 3. |
Raise and support the vehicle. |
| 4. |
Remove the rear tire and wheel assemblies. |
| 5. |
Remove the rear brake rotors. |
| 6. |
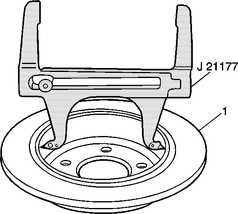
Set the CH-21177-A drum to brake shoe clearance gauge inside of the drum portion of the disc brake rotor at the widest point. Place the contacts on the tool to the widest point of the park brake drum (1). Tighten the set screw on the tool prior to removing the tool from the drum, Fig. 1. |
| 7. |
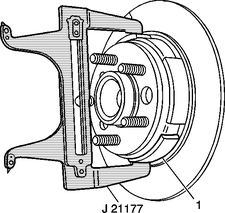
Position the CH-21177-A drum to brake shoe clearance gauge over the parking brake shoes (1) at the widest point, Fig. 2. |
| 8. |
Turn the adjuster on the actuator until the park brake shoes just contact the CH-21177-A drum to brake shoe clearance gauge. |
| 9. |
Repeat steps 6-8 for the opposite parking brake assembly. |
| 10. |
Install the rear brake rotors. |
| 11. |
Install the rear tire and wheel assemblies. |
| 12. |
Enable the parking brake cable adjuster. |
| 13. |
Apply the electronic parking brake. |
| 14. |
Place the transmission in NEUTRAL. |
| 15. |
Raise and support the vehicle so the tire and wheel assemblies are clear of the ground. |
| 16. |
Attempt to rotate the rear tire and wheel assemblies. The wheels should not rotate forward. The wheels should not rotate rearward, or should exhibit significant rearward drag. |
| 17. |
Release the electronic parking brake. |
| 18. |
Verify the rear tire and wheel assemblies rotate freely and do not exhibit forward or rearward drag. |
| 19. |
If the rear tire and wheel assemblies do not rotate freely and without forward or rearward drag, repeat the adjustment procedure completely. |
|
Adjuster Disabling
| The park brake cable tension is controlled by the electronic park brake (EPB) module. Tension can be fully released from the park brake cables to allow for service of the park brake system. Perform one of the following methods to fully release cable tension. |
Electronic Method
With Scan Tool -- Preferred
| 1. |
Block the drive wheels. |
| 2. |
Install a scan tool to the vehicle. |
| 3. |
Turn the ignition switch to the ON/RUN position with the engine OFF. |
| 4. |
Using the scan tool, perform the following: |
| |
a. |
From the scan tool menu, select "Diagnostics." |
| |
b. |
Enter the appropriate vehicle information. |
| |
d. |
Select "Parking Brake Control Module." |
| |
e. |
Select "Special Functions." |
| |
f. |
Select "Cable Replacement." |
| 5. |
Follow the instructions on the scan tool to fully release the tension on the parking brake cables. |
|
Less Scan Tool -- Optional
| 1. |
Block the drive wheels. |
| 2. |
Turn the ignition switch to the ON/RUN position with the engine OFF. |
| 3. |
Place the automatic transmission in PARK or manual transmission in NEUTRAL, as equipped. |
| 4. |
Apply and hold the brake pedal. The brake pedal must remain applied throughout the park brake cable tension release process. |
| 5. |
Press and hold down the electronic park brake (EPB) switch approximately five seconds. |
| 6. |
Observe the PARK BRAKE lamp on the instrument cluster. |
| 7. |
When the PARK BRAKE lamp flashes, release then immediately press and release the EPB switch. The parking brake cable tension is fully released. |
| 8. |
Release the brake pedal. |
|
Manual Method
| In the event the above methods to release the parking brake cable tension are unsuccessful, the following procedure may be necessary to release the parking brake cable tension. |
| The protective plug for the manual release is located near the electrical connector. |
| Do NOT use power tools to rotate the manual release mechanism. Use of power tools can damage the EPB module gear drive mechanism. |
| 1. |
Raise and support the vehicle. |
| 2. |
Remove the protective plug from the EPB manual release. |
| 3. |
Using an appropriate tool, rotate the mechanism clockwise until the tension is fully released from the parking brake cables. Up to 50 cycles may be required until the parking brake cable tension is fully released. |
| 4. |
Install the protective plug to the EPB module. |
|
Adjuster Enabling
| The park brake cable tension is controlled by the electronic park brake (EPB) module. Cable tension needs to be set and the EPB module needs to be calibrated following the cable tension disabling procedure. Perform one of the following two methods to fully restore cable tension. |
Electronic Method
With Scan Tool -- Preferred
| 1. |
Block the drive wheels. |
| 2. |
Install a scan tool to the vehicle. |
| 3. |
Turn the ignition switch to the ON/RUN position with the engine OFF. |
| 4. |
Using the scan tool, perform the following: |
| |
a. |
From the scan tool menu, select "Diagnostics." |
| |
b. |
Enter the appropriate vehicle information. |
| |
d. |
Select "Parking Brake Control Module." |
| |
e. |
Select "Module Setup." |
| |
f. |
Select "Parking Brake Calibration." |
| 5. |
The EPB module will be calibrated and proper tension will be applied to the parking brake cables. |
|
Less Scan Tool -- Optional
| 1. |
Block the drive wheels. |
| 2. |
Turn the ignition switch to the ON/RUN position with the engine OFF. |
| 3. |
Apply the brake pedal. |
| 4. |
Place the automatic transmission in PARK or manual transmission in NEUTRAL, as equipped. |
| 5. |
Momentarily lift then release the EPB switch to apply the EPB. |
| 6. |
Momentarily press down then release the EPB switch to release the EPB. |
| 7. |
Repeat steps 5-6 to cycle the EPB on then off an additional four times. |
| 8. |
The EPB module will be calibrated and proper tension will be applied to the parking brake cables. |
|

Fig. 1

Fig. 2
Adjusting the parking brake system in a Chevrolet Captiva manufactured between 2006 and 2018 is a crucial maintenance task to ensure optimal brake performance and safety. The parking brake system, also known as the handbrake or emergency brake, is designed to hold the vehicle stationary when parked and act as a backup braking system in emergencies.
To adjust the parking brake system, start by parking the vehicle on a flat surface and engaging the regular brake system. Then, locate the parking brake lever or pedal inside the vehicle. Depending on the Captiva model year and configuration, the parking brake lever may be located between the front seats or operated via a pedal near the driver's footwell.
Next, access the rear brakes of the vehicle. This may require lifting the vehicle using a jack and safely supporting it with jack stands. With the rear wheels off the ground, locate the parking brake adjustment mechanism near the rear brake calipers or drums. The adjustment mechanism typically consists of an adjusting nut or screw that controls the tension on the parking brake cables.
Carefully loosen the locknut or screw on the parking brake adjuster and adjust the tension by turning the adjuster in the appropriate direction. Turning the adjuster clockwise tightens the parking brake cables, while turning it counterclockwise loosens them. Aim for a balance where the parking brake holds the vehicle securely without excessive force on the cables.
After adjusting the parking brake tension, engage and disengage the parking brake lever or pedal several times to ensure smooth operation. Test the parking brake on a slight incline to verify that it holds the vehicle securely without dragging or locking up the wheels. Finally, lower the vehicle and double-check the parking brake adjustment to ensure it meets safety and performance standards. Regularly inspecting and adjusting the parking brake system as needed helps maintain optimal braking performance and vehicle safety.
Warning: Avoid taking the following
actions when you service wheel brake parts: Do not grind brake linings,
do not sand brake linings and do not clean wheel brake parts with a dry
b ...


 Parking Brake Shoes R&R
 Cooling System